Thanks!

Thanks!
****The original photos that go along with this post are HERE!
THANK YOU for all the sweet comments you left on Babygirl's post. I forwarded on the comments to her email (she emails our out of town family). She was so excited and happy to read each one. She sent me this email for you....
Dear mommy,
Please tell them for me thank you and I really appreciate the the things they said.
Love,
McKenna

What to make when you have berries that are on their last leg? Here is, Mixed Berry Ripple Tea Cake. It could also be blueberry ripple or blackberry if you have blackberries that need to be finished up. I'm pretty certain that, which ever berry you use you'll be pleased. This was originally supposed to be a raspberry ripple tea cake but I didn't have enough raspberries, so in went some blackberries and for good measure a few strawberries to get me to the required 12 ounces.
This was one of those desserts that was not only good but left me with a 
Raspberry Ripple Tea Cake (my changes)
for the filling
1 (12 ounce) package frozen raspberries (I used fresh raspberries, blueberries, and a few strawberries totaling 12 oz. I did use more raspberries though.)
1/4 cup granulated sugar
1 tablespoon cornstarch
for the batter
2 & 1/4 cups all-purpose flour
3/4 cup sugar
3/4 cup cold butter, sliced into thin pats
1/2 teaspoon baking powder
1/2 teaspoon baking soda
1/8 teaspoon salt
1 egg
3/4 cup buttermilk
Preheat oven to 350 degrees F. Grease and flour a 10″ round tart (I used two 4" springform pans) pan that has a removable bottom; set aside.
To make the raspberry filling: in a heavy-bottomed saucepan, combine raspberries, sugar and cornstarch over medium heat; cook and stir until thickened and bubbly. Remove from heat. Push raspberry mixture through a fine, mesh sieve, discarding seeds and pulp. Set filling aside to cool slightly; alternatively you may store airtight, refrigerate and use within 3 days.
To make the tea cake batter: in a large mixing bowl, stir together flour and sugar. Using a pastry blender, cut in butter until the mixture resembles coarse crumbs. *Measure and set aside 1/2 cup of this flour-crumb mixture and reserve for crumb topping. To remaining flour mixture add baking powder, baking soda and salt; stir well to combine. Make a well in the center of flour mixture to accept wet ingredients.
In a small mixing bowl, beat egg; stir in buttermilk until combined. Add all at once to the well you just created in the center of the flour mixture. Stir gently until just moistened; batter will be thick. Spread two-thirds of this batter over the bottom and up 1″ of the sides of prepared tart pan, using fingers to pat into place if necessary. Next, carefully spread the prepared raspberry filling on top of this batter. In small, irregular mounds, drop remaining batter on top of filling, spreading ever-so-gently with fingers or back of spoon if necessary. Allow mounds of batter to rest atop raspberry filling without pressing into bottom layer of batter. Sprinkle entire cake with the *reserved flour-crumb topping.
In the center of a preheated oven, baked tea cake at 350 degrees F for approximately 30-35 minutes (I checked mine at about 25 minutes and they were done. Use your best judgement if you're not using the 10" tart pan) or until a wooden toothpick inserted in center of cake comes out clean (filling will turn toothpick red). The cake should appear lightly browned (baking times may vary from oven to oven, so keep a close eye on your cake after 30 minutes). When tea cake is properly baked, remove tart pan from oven and allow to cool on wire rack for 15 minutes. When time has elapsed, remove cake from tart pan and place on cake stand or serving plate.

Oops, I almost forgot to tell you I initially saw this beauty on Buff Chickpea and followed the link over to Sandies' Inn Cuisine which is where Hayley first saw it. Please be certain to both blogs. They have both wonderful foods and photographs.
Today my blog is one year old. Hard to believe it's been a year. I wanted to do a special post with a giveaway and all that but things have been so hectic. Stay tuned....I'll be reading and commenting more and will announce a giveaway to celebrate 3B's b-day!
***Please see my previous post that has the photos that go along with this one. For some reason Windows Live Writer does not like those photos. Weird! Go figure!
The program doesn't like my photos.....What the heck is up with that? Why would it NOT like a certain set of photos? Is that not weird? I didn't do anything different? HELP, anyone?
Okay this is a test. The computer (????) kicks keeping back my post with the response below...
The remote server returned an error: (403) Forbidden.
whenever I try to publish a new post written through Windows Live Writer. What the heck does that mean? Help! Juuuuuuliiiiia! Somebody, anybody?
Update: This posted so it must be that individual post! Rats, I guess I'll need to mess around with it!

The recipe calls for the layers to bake at 350 degrees for 45-50 minutes. This HAS to be a mistake as ours were over cooked at about 40 minutes which was when I started checking it. I personally wouldn't make this but I would let Babygirl give it another try with me checking it after 30 minutes.

Besides baking the cake she also decorated it herself AND took the photos. I think her beginning photos just might be better than mine.
Baseball update: We played our last "official" tournament of the season. Unfortunately it didn't end as we would have liked but the team did go down battling.
Next up for my two is a trip to Cooperstown, NY for 5 baseball filled days. They are going with their coach. I'm staying behind. I will though be able to watch two of their pool play games on the internet and all of Thursday's games if their team advances passed Wednesday.
I'm sorry I haven't been around this weekend to read what delish yummies you've been whipping up and comment. I wish I could say this coming week will be a slower one but I've got a TON of baking to do for the kids' end of the year parties. With the twins in middle school they have 7 classes which means more than one teacher. Luckily I'm not baking for all fourteen of them just three. I'm hoping they don't come home from school and at the last minute add a teacher or two! :)

I baked this one afternoon when I came home early from work after picking the Twins up from the bus stop. On afternoons when it is raining either I or another thoughtful (Thanks Dawn & Kim!) mom picks up my guys along with theirs.
When I first saw this cake I knew it would just be a matter of time before I made it. It was definitely a no brainer. Unlike most chocolate doesn't do anything for us. For my family and I, it's caramel and nuts that make everything better! It didn't hurt that it would also be an easy one to put together. (It was.) I'm not certain if we're alone in this.......we love nuts ON our desserts but no so much in the dessert. Make sense? Anybody else?
I found this gem on Sandie's blog Inn Cuisine. (I also have another tasty treat to tell you about that comes from her blog.)In her post Sandie says that her cake was dense and moist. My cake was moist but it was surprisingly light almost fluffy. Maybe it was because it was still very warm from the oven? As the day progressed the weight of the caramel and nuts weighted it down a bit but still, it wasn't overly dense. Needless to say this cake didn't last until the next morning!

Pig & Whistle Cake (my changes)
Serves 6-8
for the cake
Preheat oven to 350 degrees F for baking. Spray an 8×11x2″ or 9×9x2″ baking dish with non-stick cooking spray. (I used a 9x9 & lined it with nonstick Reynolds foil that I sprayed with Pam.)
In a small saucepan over low heat, combine butter and half & half; heat until butter is melted and mixture is warmed through. In a medium-sized mixing bowl, beat eggs until light yellow; add sugar and beat until light and fluffy. To eggs and sugar add warmed butter and half & half mixture; beat until thoroughly combined; add vanilla and mix again. In a separate bowl, combine flour, baking powder and salt; blend ingredients. Add flour mixture to wet ingredients; blend well. Pour batter into a prepared 8×11x2″ or 9×9x2″ baking dish. Bake cake at 350 degrees F for 30-35 minutes, or until toothpick inserted in center comes out clean and cake springs back when touched in the center. Remove cake from oven and prepare topping.

Set oven to broil.
Mix all ingredients until thoroughly combined; pour (spread) onto hot cake and broil (in oven) until bubbly and browned (a few minutes will do). Watch cake closely; when mixture becomes bubbly throughout, remove cake from oven and allow to cool (set baking dish on wire rack). As cake cools, the topping will set. Slice and serve cake barely warm or at room temperature. (I went with nice and warm with the caramel still soft! Oh, yea!)


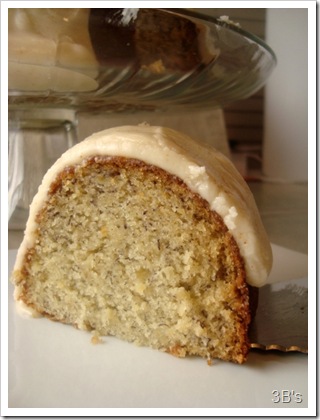
Bananas and Cream Bundt Cake with Brown Butter Glaze
Taste Of Home
Ingredients:
1/3 cup shortening
1-1/4 cups Domino® or C&H® Granulated Pure Cane Sugar
2 eggs
1 teaspoon vanilla extract
1-1/4 cups mashed ripe bananas (about 3 medium)
2 cups all-purpose flour
1-1/4 teaspoons baking powder
1 teaspoon baking soda
1/2 teaspoon salt
1 cup (8 ounces) sour cream
3/4 cup chopped walnuts (I left these out)
Domino® or C&H® Pure Cane Powdered Sugar
Directions: In a large bowl, cream the shortening and sugar until light and fluffy. Add the eggs, one at a time, beating well after each addition. Beat in vanilla. Add bananas and mix well. Combine the flour, baking powder, baking soda and salt; add to the creamed mixture alternately with sour cream, stirring just until combined. Stir in walnuts. Pour into a greased and floured 10-in. fluted tube pan. Bake at 350° for 50-55 minutes or until a toothpick inserted near the center comes out clean. Cool for 10 minutes before removing from pan to a wire rack to cool completely. Dust with confectioners' sugar. Yield: 12-16 servings.
Brown Butter Glaze
RecipeZaar
For Glaze
1/2 cup butter
3 cups powdered sugar, sifted
2 teaspoons vanilla
4 tablespoons milk
For glaze:
In a medium bowl, add powdered sugar.
Place butter in a small saucepan. Melt butter over medium heat until bubbly. Cook, stirring occasionally until golden brown.
Remove from heat and pour butter into the bowl of powdered sugar. Add milk and vanilla, stir until smooth.